Linux Related -> Tutorials -> Converting video formats with ffmpeg
Converting video formats with ffmpegIn the recent years the digital video industry has expanded a lot and the release of affordable digital video camera’s has placed the power of digital recording in most people’s reach. Unfortunately this has been accompanied with a corresponding increase in the variety of file formats and codec’s available to us. Some of these formats are more efficient than others while others are less encumbered by proprietary licensing restrictions. So having the ability to convert from one format to other is a great help as you can decide what format you are comfortable with and use that one instead of being restricted to a specific file format.
Now in the windows world a lot of free and paid solutions exist that allow you do video editing easily and cheaply but unfortunately for the Linux crowd the choices for video editing software on Linux are a lot more limited. Over the past few years I have tried a lot of different video editing software on Linux and found them to be either huge resource hogs and/or hard to use(At least for me). But just as I was about to give up looking for a decent video/audio converter for Linux I stumbled onto ffmpeg and found it to be perfect for my needs. In this article I will walk you through installing ffmpeg and teach to how to use it to convert videos into various formats.
Created by: Suramya Tomar
Original Article: 01 June 2006 (Published in June 2006 issue of Linux Journal)
This document is Copyright © June 2006, Suramya Tomar.
It is released to the public under the
Creative Commons Attribution-ShareAlike 1.0 License
You are free:
- To copy, distribute, display, and perform the work
- To make derivative works
- To make commercial use of the work
Under the following conditions:
Attribution. You must give the original author credit.
Share Alike. If you alter, transform, or build upon this work, you may distribute the resulting work only under a
license identical to this one.
- For any reuse or distribution, you must make clear to others the license terms of this work.
- Any of these conditions can be waived if you get permission from the author.
Use the information in this document at your own risk. I disavow any potential liability for the contents of this document. Use of the concepts, examples, and/or other content of this document is entirely at your own risk. They worked on my system but it doesn't necessarily mean that it would be safe to do the same on your system.
All copyrights are owned by their owners, unless specifically noted otherwise. Use of a term in this document should not be regarded as affecting the validity of any trademark or service mark.
You are strongly recommended to take a backup of your system before performing any of the actions listed in this document .
ffmpeg is an open source audio and video converter that supports most industry standard codecs and can convert from one file format to another quickly and easily. It also lets you capture video and audio from a live source and process it.
The source code for ffmpeg is available for download from the project website[1] and at the time of this article the latest version available at the site is 0.4.9-pre1.
Once you download the file, extract it using the following command:
tar -zxf ffmpeg-0.4.9-pre1.tar.gz
This will create a new directory containing the source code for ffmpeg. To install it with the default configuration options run './configure' (Without the quotes) from within the ffmpeg source directory. Once the configuration script finishes, compile it by issuing the following command 'make' (Without the quotes). Once the compile finishes without any errors you can install ffmpeg by running 'make install' (Without the quotes) as root.
On the other hand if you like to have control over what is installed and prefer customizing your software installs you can pass some command line parameters to the configure script. To see what all options that are available for the installer run the following command
./configure --help
This command will give you multiple screens of the various settings that can be modified and you can choose any options you like. The on screen display does a decent job of explaining what each option does so I will not go into a lot of detail in this.
I suggest that you enable the following options but this is not a requirement, feel free to experiment:
- --enable-mp3lame : Highly recommended, You won't be able to encode mp3's without this. Needs lame to already installed
- --enable-a52: Enable GPL'ed A52 support, needed for decoding some VOB files
- --enable-gpl: Required for the previous component. Otherwise not needed
As I didn't have lame installed on my system, I ran the following command to configure ffmpeg:
./configure --enable-a52 --enable-gpl
Once the configuration is complete read through the output to make sure that no errors were generated. Then run 'make' (Without the quotes) and go have a drink or something as this might take a little while. Once the system finishes compiling ffmpeg , run 'make install' as root to install ffmpeg and you are done with the installation.
Now that you have successfully installed ffmpeg we can start experimenting with it. The first thing you have to do is choose a video file to experiment with. As this is your first time with ffmpeg, making a backup copy of this file is highly recommended. You don’t want to be responsible for ruining the only copy of a rare video.
This input file has most probably been encoded using a particular codec but since ffmpeg supports most of the popular formats, we don't need to worry a lot about that. Formats supported by ffmpeg include MPEG, MPEG4 (Divx), ASF, AVI, Real Audio/Video, and Quicktime. To see a list of all the codecs/formats supported by ffmpeg run the following command:
ffmpeg --formats
A detailed list of supported file formats is also available at the ffmpeg site [2].
ffmpeg supports a large list of command line parameters that control various settings in ffmpeg. To get a listing of the various options available run the following command:
ffmpeg --help
Don't let the multi page listing scare you from using ffmpeg, the basic usage is actually very simple. To convert a file with the default settings run the following command:
ffmpeg -i InputFile OutputFile
The -i flag tells ffmpeg that the filename immediately after it is the name of the file to be used as input. If this flag is omitted then ffmpeg will attempt to overwrite that file when it tries to create the output file. ffmpeg uses the extension of the output file to try and determine the format and codec to use, though this can be overridden using command line parameters. (More on this later)
The default settings create an output file which has radio quality sound (64kbit/s bitrate) and very bad video quality (200 kbit/s bitrate). Fortunately these settings can be changed for each encoding, which allows us to choose the quality of each file depending on the need.
To change the audio bitrate we add the '-ab bitrate' to the command we used earlier, where bitrate is the bitrate we want to use [3]. I prefer to encode files with a bitrate between 128 - 192 kbit/s depending my needs but you can put in a higher value if you so desire, however keep in mind that the higher bitrate you use the larger the output file size will be. Also keep in mind that if your source file is encoded in a low bitrate then increasing the bitrate won't accomplish much other than increase the output file size.
Now getting a CD quality audio track for the video doesn't really make sense if the video looks like it was taken using a 5 year old web-cam having a bad day. Thankfully this problem is also easily solved by adding another parameter to our command line.
To change the video bitrate we add the '-b bitrate' switch to the command line. The bitrate here can be any numeric value you like and I have seen bitrates all the way up to 23,000 (DVD Rips). While the quality of video encoded with a 23,000 kbit/s bitrate is amazing, the resulting file size of that encoding is also very amazing (a 90 min video is about 4 GB). In my experience most videos look pretty decent at bitrates between 1000 - 1400 but this is a personal preference so play with the numbers till you figure out what works for you.
So to encode a video with a 128 kbit/s Audio bitrate and a 1200 kbit/s video stream we would issue the following command:
ffmpeg -i InputFile.avi -ab 128 -b 1200 OutputFile.mpg
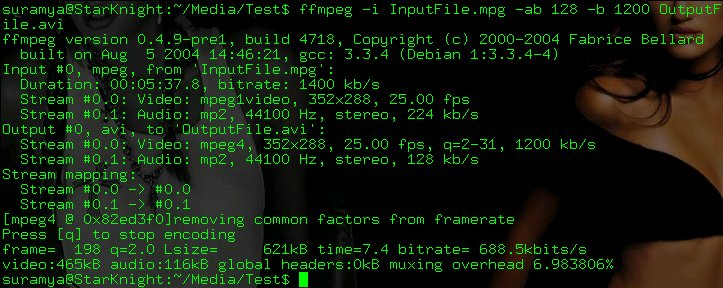
Fig 1.0 ffmpeg in action, converting an avi file to mpeg1 file
If you are creating a video CD or a DVD then ffmpeg makes it even easier for you by letting you specify a target type and then uses it to automatically calculate the format options required. To set a target type add '-target type' where type can be "vcd", "svcd", "dvd", "dv", "pal-vcd" or "ntsc-svcd" to the command line. So if we were creating a VCD we would run the following command:
ffmpeg -i InputFile.mpg -target vcd vcd_file.mpg
ffmpeg also has support for encoding audio files and the command to convert audio files is the same as the command to encode video files. So to convert a wave file to a 128 kbit/s mp3 file we would issue the following command:
ffmpeg -i Input.wav -ab 128 Output.mp3
Now the biggest selling point of ffmpeg is that you can customize it to a level that you are comfortable with. So if all you want to do is convert from one codec to another and don't really care about the advanced features then you can stop reading over here and still be able to encode/decode videos. On the other hand if you like to have more control over the encoding read on ahead as the next section covers some of the advanced options available in ffmpeg.
There are far too many options available in ffmpeg for me to go over each of them here, so I will just cover some of the ones I found interesting and leave exploring the rest to you.
Forcing the use of a particular video codec
There are a lot of times when we would want to encode a video using a particular codec and file format. ffmpeg lets you choose the codec using which you want to encode by adding '-vcodec codec' to the command line, where codec is the name of the codec you want to use. So if we want to encode using the mpeg4 codec at 1200 kbps video bitrate and 128 kbs audio bitrate our command will look like this:
ffmpeg -i InputFile.mpg -ab 128 -b 1200 -vcodec mpeg4 OutputFile.avi
Remove the audio stream
Let say you have recorded a video that has a lot of background noise and undesired commentary, so you decide to completely remove the audio component of the video. To accomplish this all you have to so is add the '-an' switch to the command line and ffmpeg automagically removes all audio from the output. Keep in mind that using this switch negates any other switch that affects the audio stream.
So in our example if we wanted to remove the audio component we would run the following command:
ffmpeg -i InputFile.mpg -an -b 1200 OutputFile.avi
Remove the Video Stream
Lets say you downloaded a news video from the net that you want to listen to on your ipod on the way to work but in order to be able to do that you have to remove the video component from the output file. ffmpeg allows you to completely remove the video component of the file by adding the '-vn' switch to the command line. Using this switch negates any other switch that affects the video stream.
So in our example if we wanted to remove the video component and save the audio as a 256 kbit/s mp3 file we would run the following command:
ffmpeg -i InputFile.mpg -vn -ab 256 OutputFile.mp3
Choose between multiple Audio stream's to encode in the output file
Many DVD's have multiple language tracks available and the you can choose which language you want to watch the video in. Having multiple audio tracks is cool if you speak multiple languages and would like to have the ability to watch videos in multiple languages, but if you don't speak multiple languages then the extra audio tracks are useless and are just taking up disk space.
ffmpeg gives you the ability to choose which stream's you want to keep and lets you ignore the rest. The command line parameter that allows you to map streams is called '-map'. So if in our test file Stream 0 is the video stream, Stream 1 is the Spanish audio Stream and Stream 2 is the English audio stream and we want to keep the English audio in the output file we would issue the following command:
ffmpeg -i InputFile.mpg -map 0:0 -map 2:1 -b 1200 OutputFile.avi
In my experience stream '0' in most video files is usually the video stream and the remaining are the audio stream's available with the video.
Hopefully after reading this article you have some idea of how ffmpeg works. If you liked the power ffmpeg gives you, take some time to drop a note to the developers and let them know that they did a great job. If you think this document helped you(or didn't) or you have some comments/questions about this please feel free to contact me and let me know. However I must warn you that I am a somewhat lazy person who might take a little while before replying to your emails.
Thanks for your time
- Suramya Tomar
8th July 2006
[1] ffmpeg project Site
[2] File formats supported by ffmpeg
[3] Sound quality the various audio bitrates represent

Home | About Me | About India |Hotlinks | Linux Related |
Mirror | Misc Section | My Blog | Photogallery | Scripts | Tech Section | Contact Me